|
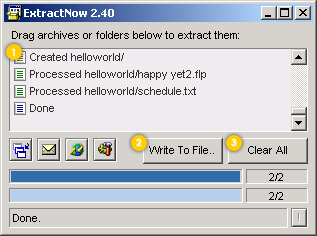
The main window is where everything happens in the program. From here you can extract files on the fly or perhaps change program settings |
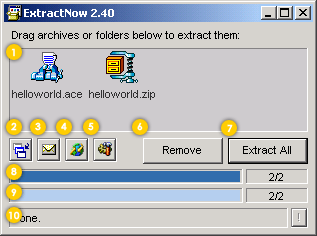
Notice, in a multi-volume archive only the first file needs to be dropped.
| ExtractNow Help |
| Written by Nathan Moinvaziri |
| Go to the ExtractNow Website |
| Last Modified October 15, 2001 |
| Contents |
| Main Window - File View |
| Main Window - History View |
| Settings Window |
| Browse For Folder Window |
| Create New Folder Window |
| Misc Features |
| Contact |
| Nathan Moinvaziri |
| http://nmoin.brinkster.net/ |
| Phoenix, Arizona |
| Notes |
| General |
| Written on Windows 98 Not Guaranteed to Work on Win98SE |
| Main Window - History View | ||
|
General | |
| 1. Shows the history of the extraction processes that have been completed | ||
| 2. Writes the history to a text document in and opens the log folder to which the text document was created in | ||
| 3. Clears all the history from the History List | ||
| Icons
|
||
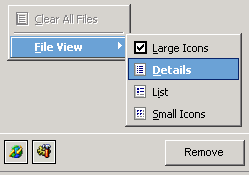
| Misc. Everything else can be found in the Main Window - File View |
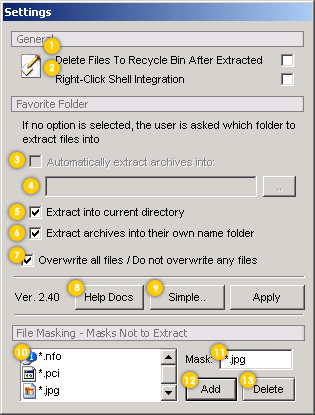
| Settings Window | ||
|
General | |
| 1. After extraction is complete, if checked, extracted files will be deleted to the Recycling Bin | ||
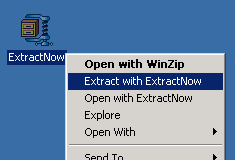
| 2. Adds explorer right-click context menus for ZIP, ACE, and RAR files. (See Right-Click Shell Integration) | ||
| Favorite Folder | ||
| 3. If this option is selected, all files that are extracted will be extracted to the path selected. | ||
| 4. Enabled if the Automatically Archives into Folder option is selected. Shows the path to extract the archives to | ||
| 5. Will extract files from each archive to the location where the archive is. c:\windows\x.zip extracts into -> c:\windows\ | ||
| != 4 || 5. If neither option 4 or 5 is chosen, then the user is asked which folder to extract the selected files into. More.. | ||
| 6. Extracts each archive into their own folder. c:\windows\x.zip extracts into -> c:\windows\x\ | ||
| 7. Gives the option to or not to automatically overwrite existing files when extracting archives. Checked = overwrite files, Unchecked = do not overwrite files | ||
| Misc. | ||
| 8. Shows these help files | ||
| 9. Expands or contracts the settings dialog to show or not show the File Masking Section |
| File Masking - Masks Not to Extract |
| Allows you to weed out any unwanted types of files. If for example you did not want to extract ANY files with the word 'sex' in their file names, you just add the mask, "sex" or "*sex*" (which are treated the same), to the List of Masks not to Extract |
| 10. Shows the List of Masks not to Extract |
| 11. Where masks are entered |
| 12. Adds the entered mask into the List of Masks not to Extract |
| 13. Deletes the selected masks from the List of Masks not to Extract |
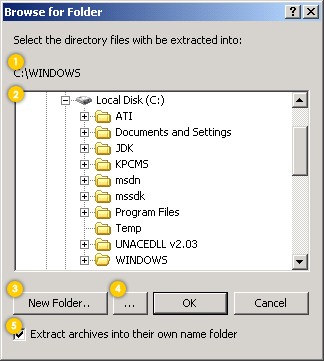
| Browse For Folder Window | ||
|
General | |
| 1. Shows the full path of the directory selected in the Directory Tree | ||
| 2. Directory Tree that shows the hierarchy of the file system on the installed computer. | ||
| 3. Allows the creation of a specified folder under the directory selected in the Directory Tree (See Create New Folder Window) | ||
| 4. Expands and contracts the Extract Archives into their own Name Folder option | ||
| 5. Extract Archives into their own Name Folder option (same option as the one in the Settings Window). If selected, then it will apply for all archives extracted. c:\windows\x.zip is the archive name and if Ok were pressed then it would extract the contents of c:\windows\x.zip into -> c:\windows\x\ | ||
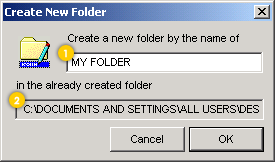
| Create New Folder Window | ||
|
General | |
| 1. Specifies the folder name | ||
| 2. Directory to create folder name in | ||
| This example will create
the new folder of c:\windows\my folder\ |
| Misc. Features | |||
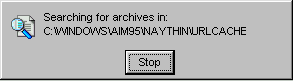
| Password | Search through folders for archives | ||
|
|
||
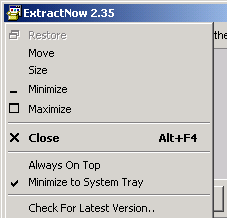
| Always On Top | Check For Latest Version | ||
|
|
||
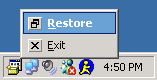
| Minimize to System Tray | Right-Click Integration | ||
|
|
||
| View Menu | |||
|